Free Contractor Receipt Template
Create professional contractor receipts in under 30 seconds. Download free templates with labor/materials breakdown, project details, PAID stamp, and location.
Download Free Contractor Receipt Template
Get Your Free Contractor Receipt Template
Download in your preferred format. Customize with your logo, colors, and business details. Start issuing professional receipts in minutes.
Microsoft Word
Easy to customize, add your logo
Microsoft Excel
Auto-calculate totals and taxes
Share of small businesses in construction and home improvement requiring project-phase receipts
Time to create and deliver a professional contractor receipt from your phone — even offline
Most states require written documentation of contractor work performed and payment received
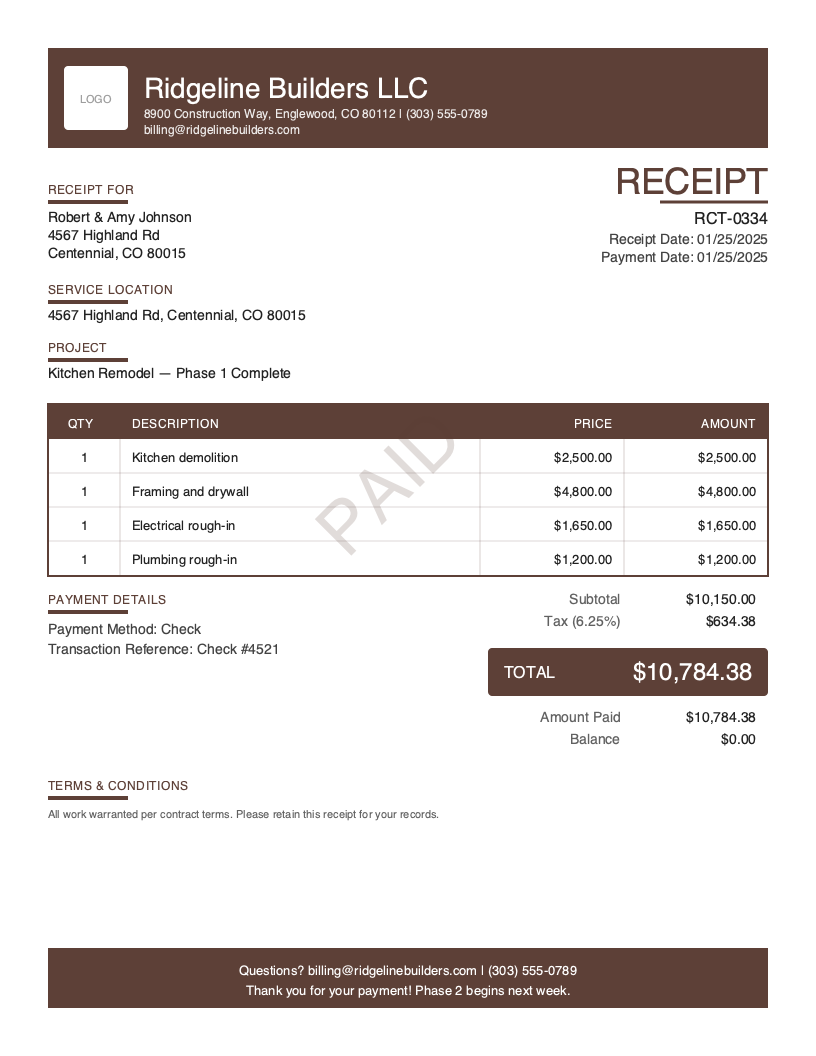
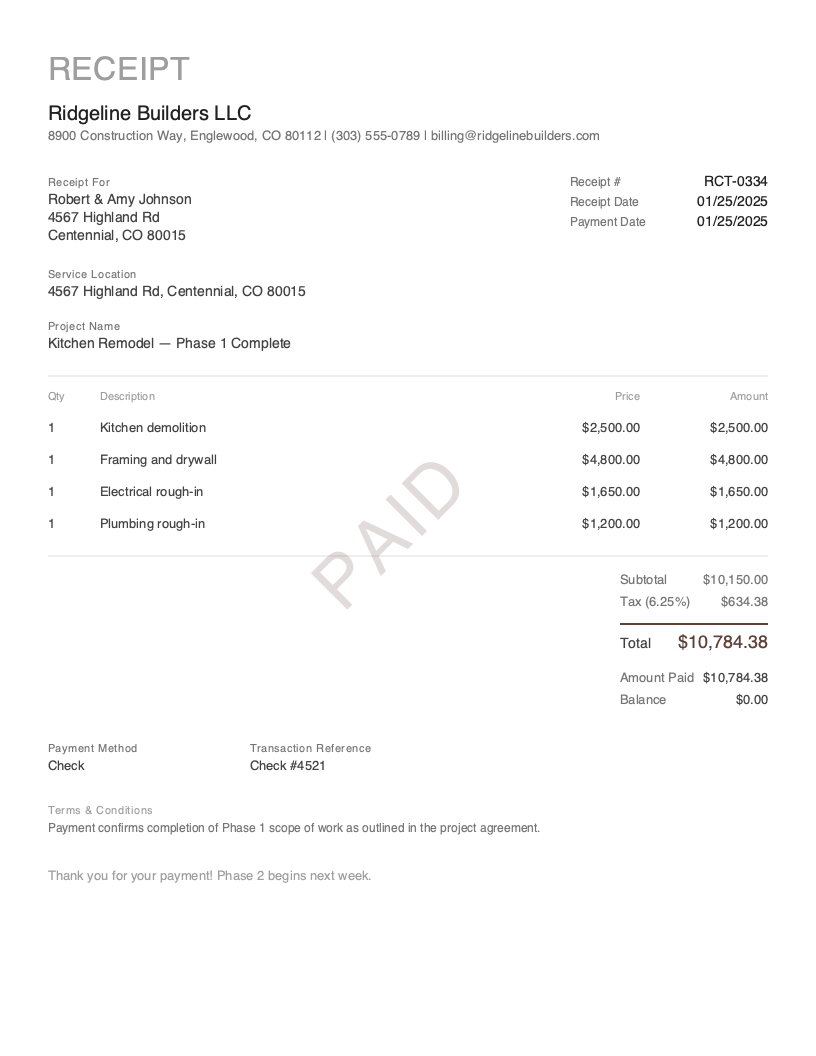
You just finished Phase 1 of a kitchen remodel — demolition, framing, electrical rough-in, and plumbing rough-in. The homeowner hands you a check for $10,150. Before you walk off the job site, they need a receipt that breaks down every line item: $2,500 for demolition, $4,800 for framing and drywall, $1,650 for electrical, $1,200 for plumbing. They need the project name, the service address, and proof that the check was received. Their mortgage company requires it for the home improvement loan reimbursement.
Contractor receipts carry more weight than a typical sales receipt. They document construction and home improvement projects with specific labor costs, materials used, and the property where work was performed. In many states, home improvement contractors are legally required to provide written documentation of work completed and payment received — a professional contractor receipt satisfies this requirement and protects both you and your client.
Here’s the distinction that matters: a contractor receipt confirms that project work was completed and payment was received. It’s not an estimate, not a bid, and not an invoice requesting future payment. It’s the document your client shows their insurance company, their mortgage lender, or their tax preparer as proof that the work happened and the money was paid. Every contractor receipt should include a PAID stamp, a project name, the service location, and a clear labor-and-materials breakdown.
What you’ll find on this page:
- Free downloadable contractor receipt templates (Word & Excel)
- Complete breakdown of required contractor receipt elements
- When and why contractor receipts matter for your business
- Best practices for construction and home improvement receipts
- How to create contractor receipts from your phone in under 30 seconds
Download Free Contractor Receipt Templates
Get started immediately with our professionally designed contractor receipt templates. Both formats include a PAID stamp, project name field, service location, and labor/materials breakdown structure.
| Format | Best For | Download |
|---|---|---|
| Microsoft Word | Easy customization — add your logo, license number, and project details | Download Word |
| Microsoft Excel | Auto-calculate labor hours × rate, materials totals, and tax | Download Excel |
Tip: The Excel template includes built-in formulas that calculate labor costs (hours × hourly rate), materials subtotals, and the combined project total with tax. Enter your rates, hours, and material quantities — the receipt handles the math.
Both templates include a PAID stamp, project name, service address, and separate labor/materials sections — the elements that make a contractor receipt legally compliant and professionally credible.
Want more polished designs? Create custom receipts with our receipt generator.
What to Include on a Contractor Receipt
A contractor receipt documents two things: the construction or improvement work that was completed and the payment that was collected. Unlike a basic sales receipt, a contractor receipt must capture project scope, physical location, and a detailed breakdown of labor versus materials. Both your client and various third parties — insurance adjusters, mortgage lenders, home inspectors, tax preparers — may need this document.
Required Receipt Sections
| Section | What to Include | Why It Matters for Contractors |
|---|---|---|
| Receipt Header | Receipt number (RCT-0001), receipt date, document title “RECEIPT” | Creates a traceable record for the project — essential for multi-phase jobs |
| Business Information | Company name, address, phone, email, contractor license number | License number is legally required on contractor documents in most states |
| Client Information | Client name and billing address | Links receipt to the property owner for warranty and legal records |
| Service Location | Property address where work was performed | Contractor-specific — ties the receipt to a physical property; critical for permits, insurance, and property records |
| Project Name | Project description and phase | Contractor-specific — identifies the scope (e.g., “Kitchen Remodel — Phase 1 Complete”) |
| Line Items | Labor, materials, equipment, and subcontractor costs | Detailed breakdown is the standard for construction — clients and lenders expect itemization |
| Pricing Summary | Subtotal, tax, total, amount paid, balance ($0.00) | Confirms the project payment was collected in full |
| Payment Details | Payment method (check, card, cash), transaction reference, payment date | Documents how payment was made — check numbers are common in construction |
| PAID Indicator | Prominent PAID stamp or badge | Immediately communicates the payment is settled — critical for lender documentation |
| Terms & Conditions | Warranty terms, lien waiver language, project scope limitations | Protects against liability and sets expectations for what was and wasn’t included |
| Thank You Message | Brief gratitude and next-phase reference | Professional close; mention upcoming phases if applicable |
Critical Contractor Receipt Elements
Labor and Materials Breakdown Construction clients expect granular itemization. Don’t write “Kitchen remodel — $10,150.” Break it into categories: demolition labor ($2,500), framing and drywall ($4,800), electrical rough-in ($1,650), plumbing rough-in ($1,200). Within each category, separate labor hours from materials where possible. This level of detail is often required for loan reimbursements, insurance claims, and permit compliance. Lenders may refuse to process a draw request without itemized documentation.
Service Location (Job Site Address) Every contractor receipt must include the property address where work was performed. This isn’t the client’s mailing address — it’s the job site. For residential projects, these are often the same. For investment properties, commercial jobs, or property managers handling multiple locations, the service location is different from the billing address. This field ties the receipt to a physical property for permit records, property disclosures, and warranty tracking.
Project Name and Phase Construction work is rarely a single transaction. A kitchen remodel has demolition, rough-in, finish work, and final inspection. A new deck has foundation, framing, and finishing. Label each receipt with the project name and the phase it covers: “Kitchen Remodel — Phase 1 Complete.” This creates a paper trail across the entire project and prevents confusion when multiple receipts exist for the same client and property.
Contractor License Number Most states require contractors to display their license number on all customer-facing documents — estimates, invoices, contracts, and receipts. Include your license number, any bonding information, and your insurance carrier in the business information section. This isn’t just compliance — it signals professionalism and builds homeowner confidence. Clients filing insurance claims or selling their home may need to produce contractor documentation with verifiable licensing.
Understanding Contractor Receipts
When You Need a Contractor Receipt
Contractor receipts apply across all construction and home improvement scenarios:
Phase completion payments. Multi-phase projects generate multiple receipts. The homeowner pays after demolition — you issue a receipt for Phase 1. They pay after framing — you issue a receipt for Phase 2. Each receipt documents what was completed and what was paid for that phase.
Final project payment. When the entire job is done — punch list complete, final inspection passed — the final receipt documents the last payment and closes the project. This receipt often accompanies a certificate of completion.
Cash or check collection on-site. Residential contractors frequently collect checks (and sometimes cash) at the job site. The receipt is created before you leave, documenting the check number and amount. For cash payments, use a cash receipt with contractor-specific fields.
Lender or insurance documentation. Homeowners with construction loans, home equity lines, or insurance claims need contractor receipts to process draw requests and reimbursements. The lender or adjuster requires itemized documentation of work completed and payment made.
Who Uses Contractor Receipts
Contractor receipts are built for the field service persona — specifically the construction, home improvement, and trades segment. General contractors, remodeling companies, roofers, deck builders, fencing installers, flooring contractors, painters, and any professional performing construction-related work at a client’s property.
This is a subset of the broader service receipt category, specialized for construction. The key difference: contractor receipts emphasize project phases, permit-related documentation, materials sourcing, and the physical property where work was performed.
Contractor Receipts vs. Invoices
An invoice says: “Phase 1 is complete. Here’s the breakdown — $10,150 is due within 30 days.” A contractor receipt says: “Phase 1 is complete. You paid $10,150 by check on March 1. Here’s the proof.” If you collect payment on completion (common in residential contracting), skip the invoice and issue a receipt directly. If you invoiced first and the client pays later, the system generates a payment receipt linked to the original invoice.
Legal Requirements for Contractors
Contractor receipt requirements vary by state but commonly include: contractor name and license number, client name and property address, itemized description of work performed, materials used, total cost with labor/materials separation, payment received, and date. Some states require specific language about lien waivers or right-to-cancel periods. Check your state’s home improvement contractor laws — in states like California, New York, and Florida, the documentation requirements are detailed and failure to comply can result in penalties or loss of contractor license.
Create Contractor Receipts in Under 30 Seconds
Paper receipt books get lost. Spreadsheet templates require a laptop. When you’re standing in a client’s driveway after a 10-hour day, you need something faster. You need a receipt you can create from your phone before you load the truck.
Pronto Invoice is built for contractors who work on-site. Create detailed project receipts from your phone in 5 simple steps — even without cell signal.
- Select Client — choose from saved clients or add the homeowner on the spot
- Add Items — pick from saved services (demolition, framing, electrical, etc.) or enter custom line items with labor hours and material costs
- Payment Info — select how payment was made (check is common — enter the check number as transaction reference)
- Document Details — receipt number auto-generates; add project name, phase, service location, and notes
- Review & Send — hand the homeowner their receipt or email it before you leave
The key difference from invoicing: Step 3 asks “How was this paid?” — not “How can they pay?” You’re documenting a completed payment, not requesting a future one.
Features for Professional Contractor Receipts
- PAID Stamp — every receipt includes a prominent PAID indicator, automatically applied
- Offline Capability — create receipts at job sites with no cell signal. Basements, rural properties, new construction without utilities — it all works. Syncs when you’re back online.
- Labor + Materials Tracking — separate labor hours and materials with automatic total calculations
- Photo Attachments — attach up to 4 completion photos documenting the finished work
- On-Site Signature — capture the homeowner’s signature confirming work completion and payment received
- Project Tracking — label receipts by project name and phase for multi-stage jobs
- Auto-Receipt on Payment — if you invoiced first and record payment later, the receipt auto-generates with all project details pre-filled
- Invoice-to-Receipt — convert any paid contractor invoice to a receipt with one tap
Create Your First Contractor Receipt Free →
Related Receipt Templates
Looking for other receipt types? Browse our complete collection:
- Service Receipt Template — general labor and maintenance receipts
- Cash Receipt Template — cash payment documentation with signature
- Deposit Receipt Template — partial payments and project retainers
- Payment Receipt Template — invoice payment confirmations
- All Receipt Templates
- Construction Invoice Template
- Roofing Invoice Template
- All Invoice Templates
Start Creating Professional Contractor Receipts Today
Every completed project phase deserves a professional receipt — for your protection, your client’s lender, and your license compliance. Pronto Invoice creates detailed contractor receipts from your phone in under 30 seconds, works offline at any job site, and tracks labor, materials, and project phases automatically.
Create Free Contractor Receipt → | Download the App →
This guide is for informational purposes only and does not constitute legal or tax advice. Consult with a qualified professional for guidance specific to your situation and jurisdiction.
Last updated: March 2026
Contractor Receipt Best Practices
Issue the Receipt Before You Leave the Job Site
Create and deliver the receipt while you're still on-site. The homeowner is there, the work is visible, and both parties can confirm the details. Mobile receipt apps make on-site creation a 30-second process.
Itemize Labor and Materials Separately
Lump-sum receipts are a red flag for lenders, insurance adjusters, and savvy homeowners. Break every project into specific line items with labor hours, hourly rates, material quantities, and unit costs.
Use Professional, Branded Templates
Your receipt is the last document your client sees at the end of a project phase. A clean, branded receipt with your logo, license number, and organized line items reinforces the quality of your work.
Include Project Phase References
Label every receipt with the project name and phase: 'Bathroom Remodel — Phase 2: Tile and Fixtures.' Clear phase labeling prevents confusion about what each payment covered across multi-stage jobs.
Document Permit and Inspection Status
When your work requires permits, note the permit number and inspection status on the receipt. This demonstrates compliance and gives the homeowner documentation for property resale or future work.
Attach Completion Photos
Photograph the completed work before you leave. Before and after photos attached to the receipt create an indisputable record of what was delivered and support warranty claims.
Include Warranty and Lien Waiver Language
Add warranty terms directly to the receipt and consider including conditional lien waiver language confirming that upon receipt of payment, you waive the right to file a mechanic's lien for the work described.
Frequently Asked Questions
A professional contractor receipt should include: your business name, contact information, and contractor license number; the client's name and billing address; the job site address (service location); the project name and phase; itemized line items separating labor from materials; subtotal, tax, total, and amount paid; the payment method and transaction reference (check number, card confirmation, etc.); a PAID stamp; and warranty terms or lien waiver language.
No. An invoice is issued before payment — it's a bill requesting money for completed or upcoming work. A receipt is issued after payment — it confirms money was received. For contractors, the invoice describes the work and states the amount owed. The receipt confirms the work was completed and the payment was collected. Both documents should reference the same project and line items.
Requirements vary by state, but most states with home improvement contractor licensing laws require written documentation of work performed and payment received. California, New York, Florida, Texas, and many other states have specific requirements for contractor documentation. Even where not legally mandated, contractor receipts protect you from payment disputes, support lien rights, and satisfy lender documentation requirements.
Issue a separate receipt for each phase payment. Label each receipt with the project name and phase number: 'Kitchen Remodel — Phase 1: Demolition,' 'Kitchen Remodel — Phase 2: Rough-In,' etc. Each receipt documents the specific work completed and payment collected for that phase.
Yes — it's legally required in most states and professionally expected everywhere. Your contractor license number, bonding information, and insurance details should appear on every client-facing document: estimates, contracts, invoices, and receipts.
Use a mobile invoicing app like Pronto Invoice. Tap 'New Receipt,' select the contractor receipt type, add the homeowner and job site address, enter labor and material line items, set the payment method (often check — include the check number), add the project name and phase, capture a signature if needed, and send. The entire process takes under 30 seconds and works offline.
A service receipt is the general template for any completed labor-based work. A contractor receipt is specialized for construction and home improvement — it adds project name, phase tracking, service location emphasis, permit references, and lien waiver language that a general service receipt doesn't include. Use a contractor receipt for any construction, remodeling, or home improvement work.
Related Receipt Templates
Start Creating Professional Receipts Today
Create your first receipt in under 30 seconds. Join thousands of professionals who use Pronto Invoice to issue receipts on the spot.
This guide is for informational purposes only and does not constitute legal or tax advice.